

How To Enable Infopath Services In Sharepoint 2010
K2 blackpearl Product Documentation: Installation and Configuration Guide
InfoPath Forms Services
InfoPath Forms that utilize InfoPath Forms Services (IPFS) require the utilize of an IPFS Spider web service proxy to execute external data source Web services from claims hallmark sites.
The following steps will enable InfoPath Forms Services Spider web service proxy in your environment.
Enable InfoPath Form Services Spider web Service Proxy
Via PowerShell
- Start SharePoint 2010 Direction Shell
- Replace {WebAppURL} in the script below with the URL to the claims authentication web application
- Run the script
 Re-create Script Re-create Script |
|---|
| Add together-PsSnapin Microsoft.SharePoint.PowerShell Set up-SPInfoPathWebServiceProxy -Identity {WebAppURL} -AllowWebServiceProxy $true Set-SPInfoPathWebServiceProxy -Identity {WebAppURL} -AllowForUserForms $true |
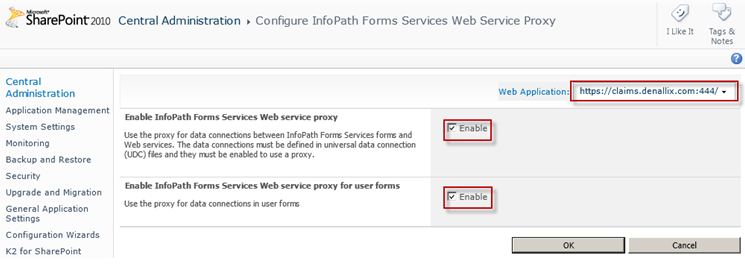
Via Primal Administration
- Navigate to Key Assistants > General Application Settings > Configure InfoPath Forms Services Web Service Proxy
- Web Application: {select the advisable web application}
- Enable InfoPath Forms Services Web service proxy: Checked
- Enable InfoPath Forms Services Web service proxy for user forms: Checked
Register Claims Spider web Site Certificates
InfoPath Forms Services Web service proxy must take access to the certificates utilized by the web awarding using claims authentication's web site when it is enabled for SSL.
Note: All the certificates in the Certification Path must be registered.
The following steps volition register a certificate with one parent certificate in the certification path. Adjust the scripts based on the certification path.
- Recollect the required certificates in the DER encoded binary Ten.509 (CER) file format for import into SharePoint 2010. The method required to export the certificates may vary depending on environs. Steps 1 a-thousand will illustrate how to export the certificates for a claims authentication web site on IIS 7.
- Start Internet Information Services (IIS) Manager
- Select Server Certificates from the Features View
- Select the document associated with the web site enabled for claims authentication and select View…
- Select the Details tab for the certificate and click the Copy To File… button
- The Certificate Consign Sorcerer volition start. Navigate through the wizard using the post-obit values.
- Export Private Fundamental: No, practise not export the private key
- Consign File Format: DER encoded binary X.509 (CER)
- File to Consign: Specify a {CertificateFilePath}
- In one case the file has been exported, select the Certification Path tab
- Double click on whatever other certificates in the certification path and repeat steps one.d and 1.e for each ane.
- Start SharePoint 2010 Management Console
- Replace {CertificationFilePath} and {CertificationParentFilePath} in the script below with the path to the claims authentication site certificates.
| Copy Script |
|---|
| # Register the claims site certificates for IPFS Web services proxy calls $cert = New-Object System.Security.Cryptography.X509Certificates.X509Certificate2("{CertificationParentFilePath}") iisreset |
K2 Course Client Options
InfoPath customer applications cannot use a information connexion (UDCX) that is configured to use the Web service proxy – this only works for IPFS forms. Unfortunately, the UDCX does not support the option to use the Web service proxy from IPFS and not apply the proxy from InfoPath Client – it is locked to one or the other. Therefore, the selection that K2 integration provides to enable the Grade Customer to employ "InfoPath, Web browser if InfoPath not bachelor" cannot be supported for InfoPath forms on claims authentication sites. This event has been logged with Microsoft but a resolution is outstanding.
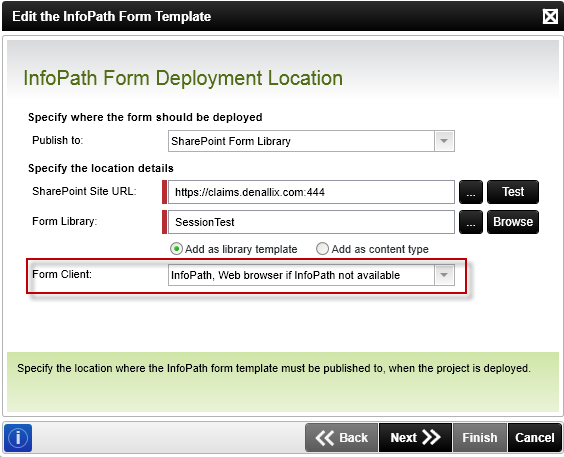
If this option is selected, the data connection will be configured to only support InfoPath client when deploying to a claims authentication site. The form will not function properly if opened in the browser. If browser back up is desired on a claims authentication site, you must select Web browser and redeploy your solution.
K2 blackpearl Product Documentation: Installation and Configuration Guide 4.half-dozen.x


Source: https://help.nintex.com/en-US/k2blackpearl/icg/4.6.10/Claims_-_InfoPath_Forms_Services.html
Posted by: christiankeent1945.blogspot.com
0 Response to "How To Enable Infopath Services In Sharepoint 2010"
Post a Comment